 International
 Singapore
 Malaysia
 Thailand
 Vietnam
Your shopping cart is empty!
")
Push-up Counter Using Arduino UNO and Ultrasonic Sensor with LCD (16x2)
- Abdulrahman
- 08 Sep 2022
- 1419
Push-ups are a very useful technique to build muscles and strengthen your upper body. However, it must be done in the right way or else it may cause injuries or pain in the back or shoulders. On the other hand, this system aims to help avoid this pain and injury by simulating the proper body pose using sensors. So, in this tutorial we shall see how to build the counter using Arduino UNO.
Components
- Arduino Uno Rev3-Main Board
- 5VDC HC-SR04 Ultrasonic Sensor
- LCD (16x2) Yellow Backlight
- Resistor 0.25W 220ohm
- Breadboard 8.5x5.5cm (400 Holes)
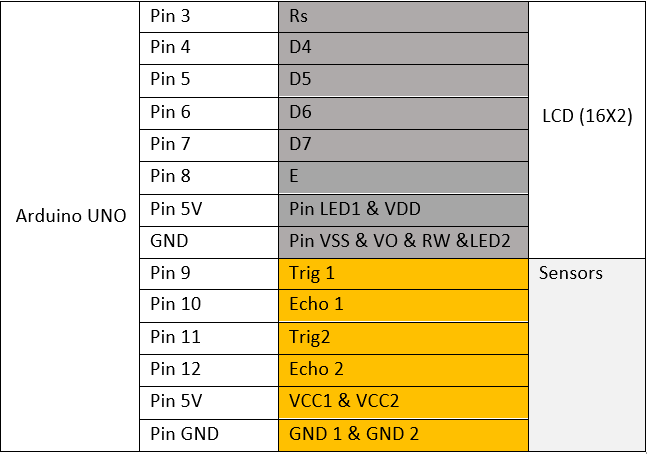
Hardware Connection
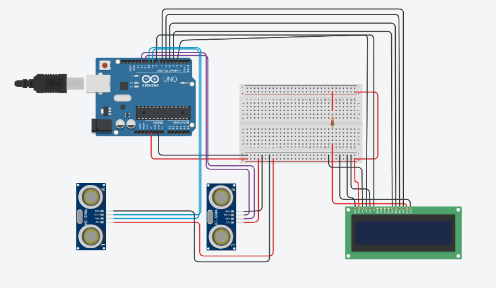
Code
#include

const int Re = 3, E = 8, d4 = 4, d5 =5, d6 = 6, d7 = 7;

LiquidCrystal lcd(Re,E,d4,d5,d6,d7);

#define trigpin1 9

#define echopin1 10

#define trigpin2 11

#define echopin2 12

int limit=1;

int count=0;

long distance1, duration1, distance2, duration2;
void setup ()

{

  lcd.begin(16, 2);// set the LED's columns and rows

  Serial.begin(9600);

  pinMode(9, OUTPUT);

  pinMode(10, INPUT);

  pinMode(11, OUTPUT);

  pinMode(12, INPUT);

  lcd.print("Hi there!");

  delay(2000);

  lcd.clear();

  lcd.print("are you ready?");

  delay(3000);

  lcd.clear();

  lcd.print("place your hands ");

  lcd.setCursor(0,1);

  lcd.print("and foot");

  delay(6000);

  lcd.clear();

  lcd.print("go");

  delay("2000");

  lcd.clear();
}
void loop()

{

digitalWrite(trigpin1, LOW);

  delayMicroseconds(5);

digitalWrite(trigpin1, HIGH);

  delayMicroseconds(10);

digitalWrite(trigpin1, LOW);

  duration1= pulseIn(echopin1,HIGH);

  distance1=duration1*0.0343/2;
digitalWrite(trigpin2, LOW);

  delayMicroseconds(5);

digitalWrite(trigpin2, HIGH);

  delayMicroseconds(10);

digitalWrite(trigpin2,LOW);

  duration2= pulseIn(echopin2,HIGH);

  distance2= duration2 * 0.034/2;;
if (distance1 <=10 && distance2 <=10 && limit == 1 ) {
     count = count+1;

     limit = 0;
     lcd.clear();

       lcd.print("A");

        lcd.print(" ");

        lcd.print(distance1);
        lcd.print("");

        lcd.print("B");

        lcd.print(" ");

        lcd.print(distance2);
lcd.setCursor(0, 1);
        lcd.print(" ");

        lcd.print("N");

        lcd.print(" ");

        lcd.print(count);

        delay(1300);
  Serial.print(distance1);

    Serial.print("|");
    Serial.print(distance2);

    Serial.print("|");
    Serial.print(count);

    Serial.print("|");

    }
  if((distance1 <= 20) && (distance2  20) || (distance2 > 10))

{

  limit = 1;

      count = count;

      lcd.clear();

        lcd.print("A");

        lcd.print("-");

        lcd.print(distance1);
        lcd.print(" ");

        lcd.print("B");

        lcd.print("-");

        lcd.print(distance2);
        lcd.setCursor(0,1);

  lcd.print("    ");

        lcd.print("N");

        lcd.print("-");

        lcd.print(count);

  delay(250);

  }

  }
Tutorial Video
As shown in the above video tutorial, The LCD displays the distance of the first and the second sensor as A and B, and N as the number of push-ups. The counter will start counting up only when the 2 sensors detects a body ( object ), depending on the specified distance in the code.
Thank You
Thanks for going through this tutorial. If you have any technical inquiries, please ask in the comment section.
Related Products
-268x268.jpg "Arduino Uno Rev3 (Original Italy)")
Arduino Uno Rev3 (Original Italy)
$34.50 $34.50
x 1 unit(s)