 International
 Singapore
 Malaysia
 Thailand
 Vietnam
Your shopping cart is empty!

Nvidia Jetson Nano Boot from USB
Jetson Nano does not have enough storage? MicroSD card is too slow? We have a solution!
Introduction
The release of Nvidia Jetson Nano has provided the world of makers with an affordable yet high-performance solution for AI applications. However, one problem with Jetson Nano is that it only has one storage option -- microSD card. We all know that the MicroSD card has very limited storage and read/write speed when compared with a hard disk drive (HDD) and solid-state drive (SSD). As the operating system is installed in the MicroSD card, this device provides relatively slow access, both the Read and Write operation.
To solve this problem, we can add an external drive to the Jetson Nano through the USB 3.0 port and configure the Jetson Nano to boot from the USB drive. Let's get started!
Update 24/11/2020: It works for Nvidia Jetson Nano 2GB running in LXDE 18.04 (see Nvidia's official guide) as well. Only the steps for formatting the USB drive is changed due to the difference in desktop environment, the others remains the same.
Requirements
Hardware:
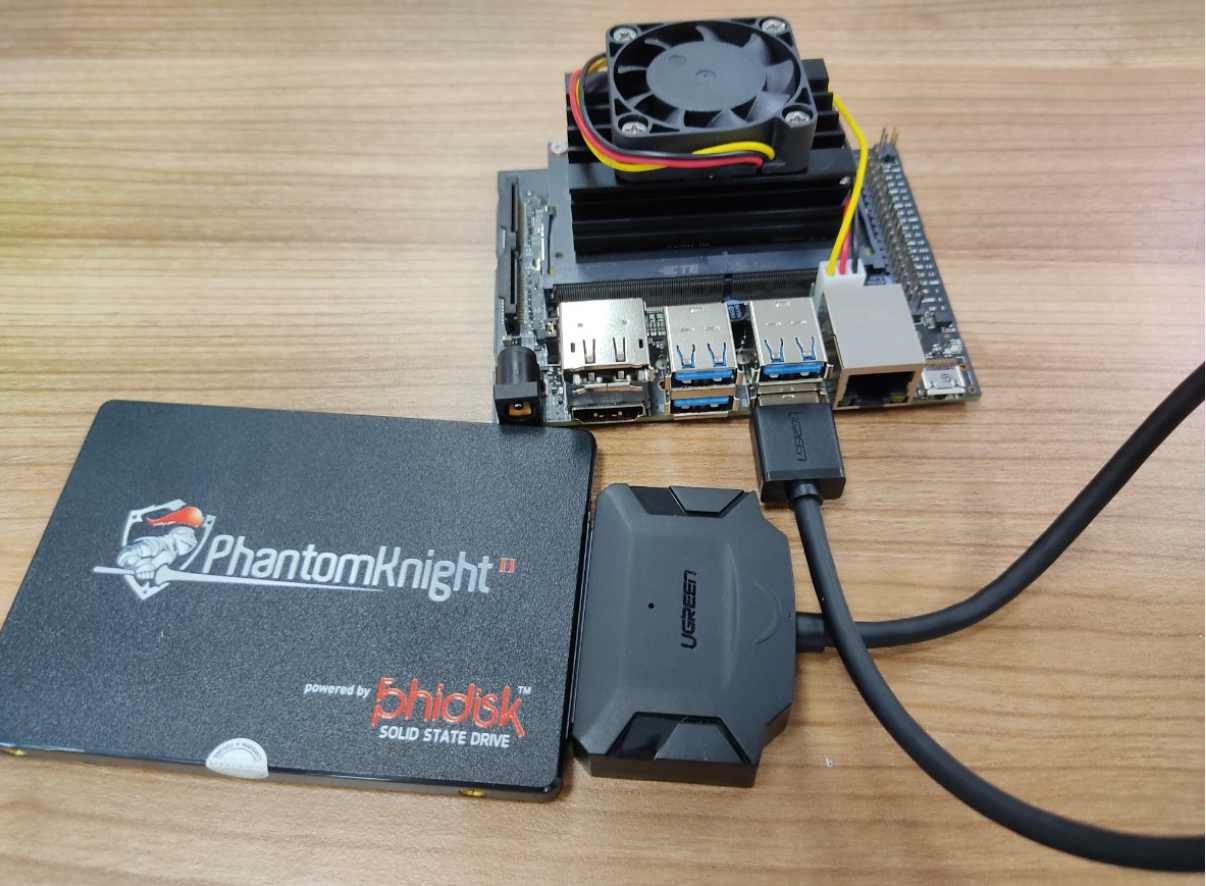
- 1 x USB 3.0 to SATA III Adapter, or Geekworm T300 (Optional)
- 1 x SATA III SSD (120GB)
- 1 x MicroSD card (32GB) -- freshly flashed (Recommended 16GB)
OS Version (Tested):
- Jetson Nano 4GB: JetPack 4.4 / NVIDIA L4T 32.4.3 / Ubuntu 18.04
- Jetson Nano 2GB: LXDE 18.04
Note: The volume of the external drive must be GREATER THAN the micro SD card.
Jump to the Software Setup section if you already have your hardware assembled.
Hardware Setup
1. Installation
In fact, you can use other types of USB to SATA adapter as well such as UGreen USB 3.0 to SATA III 6Gbps 2.5-inch SSD Adapter connect it to any preferred SSD or HDD (2.5") and insert the USB 3.0 to Jetson Nano's USB3.0 port.
Software Setup
If you are using Jetson Nano 2GB running in LXDE Desktop Environment, please refer to the tutorial for formatting the USB drive using UNIX command.
Please refer to this tutorial for configuring your Jetson Nano. Be sure to watch the video for step by step guideline.
[youtube https://www.youtube.com/watch?v=J9EJ52Za7IE]
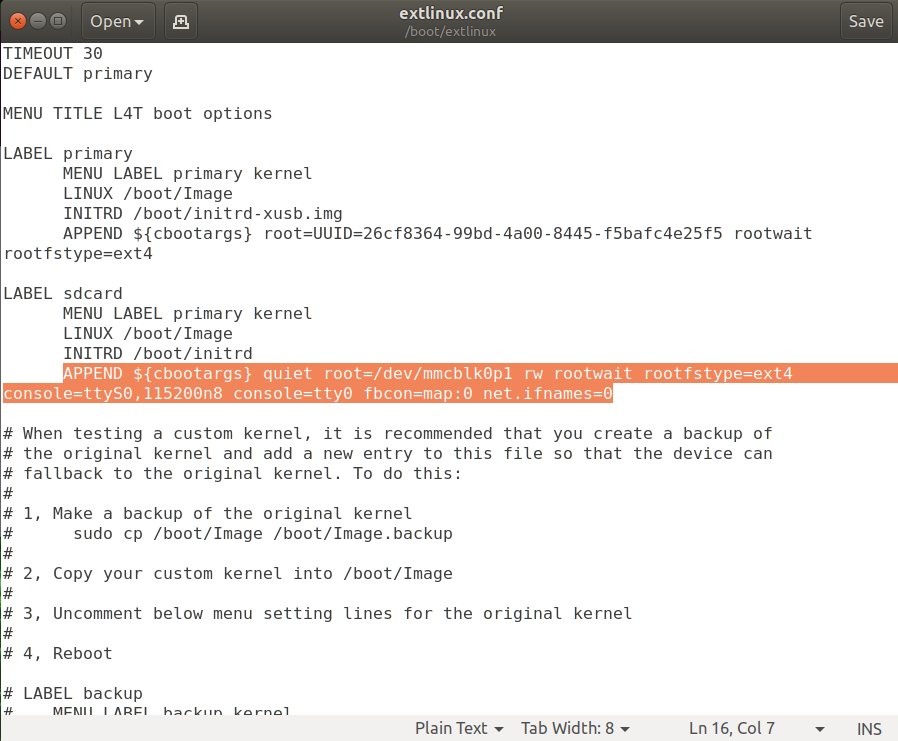
Note: JetPack 4.2 is being used in the tutorial but it works by applying the same steps for JetPack 4.4. There are extra lines at the “APPEND” section in the "extlinux.conf" file. Just copy and paste the whole section. Your edited "extlinux.conf" file should look something like this:
Formatting the USB Drive using UNIX Command
To simplify the steps for formatting the USB drive using command line, make sure that you only have one USB drive being connected to the Jetson Nano. Firstly, we need to search for the device path of the USB drive by entering the command in the terminal:
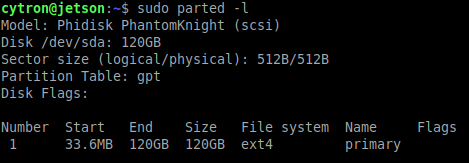
$ sudo parted -l
Look for the device path of the USB drive, in this case it is "/dev/sda".
We have to obtain the optimal IO size and physical block size of the USB drive by entering the 2 commands below (you have to change the term "sda" into the device path as obtained from the previous step):
$ cat /sys/block/sda/queue/optimal_io_size
$ cat /sys/block/sda/queue/physical_block_size
Now we have to do some math to so that we can align partitions for best performance. Divide the values of optimal_io_size with physical_block_size, this will be the number of the sector at which the partition should start. You can look for more information in this blog.
After obtaining the number of sector, it's time to format the USB drive. Make sure that there are no important files inside before proceeding to the next step!
$ sudo parted /dev/sda
$ mklabel gpt
You might be prompted to confirm the formatting, just enter "y" for confirmation. After formatting, we need to create the partition in the USB drive. Replace the
$ mkpart primary ext4 Press ctrl + D to exit the parted command line. Then, we have to properly format the partition we created earlier to ext4 file system. Make sure that you change the term "sda" into the device path being obtained previously.
$ mkfs.ext4 /dev/sda1
$ sudo parted -l
Search for the USB drive again. If all of the steps are taken correctly, you will see that the Partition Table is set to "gpt" and the file system for the partition is "ext4" as shown in the image above.
$ sudo mkdir /mnt/usbboot
$ sudo mount /dev/sda1 /mnt/usbboot
Now your USB drive is properly formatted, please can refer back to the Software Setup section to complete the setup for boot from USB drive.
Results
If you have done the steps correctly, you should be able to see the following items:
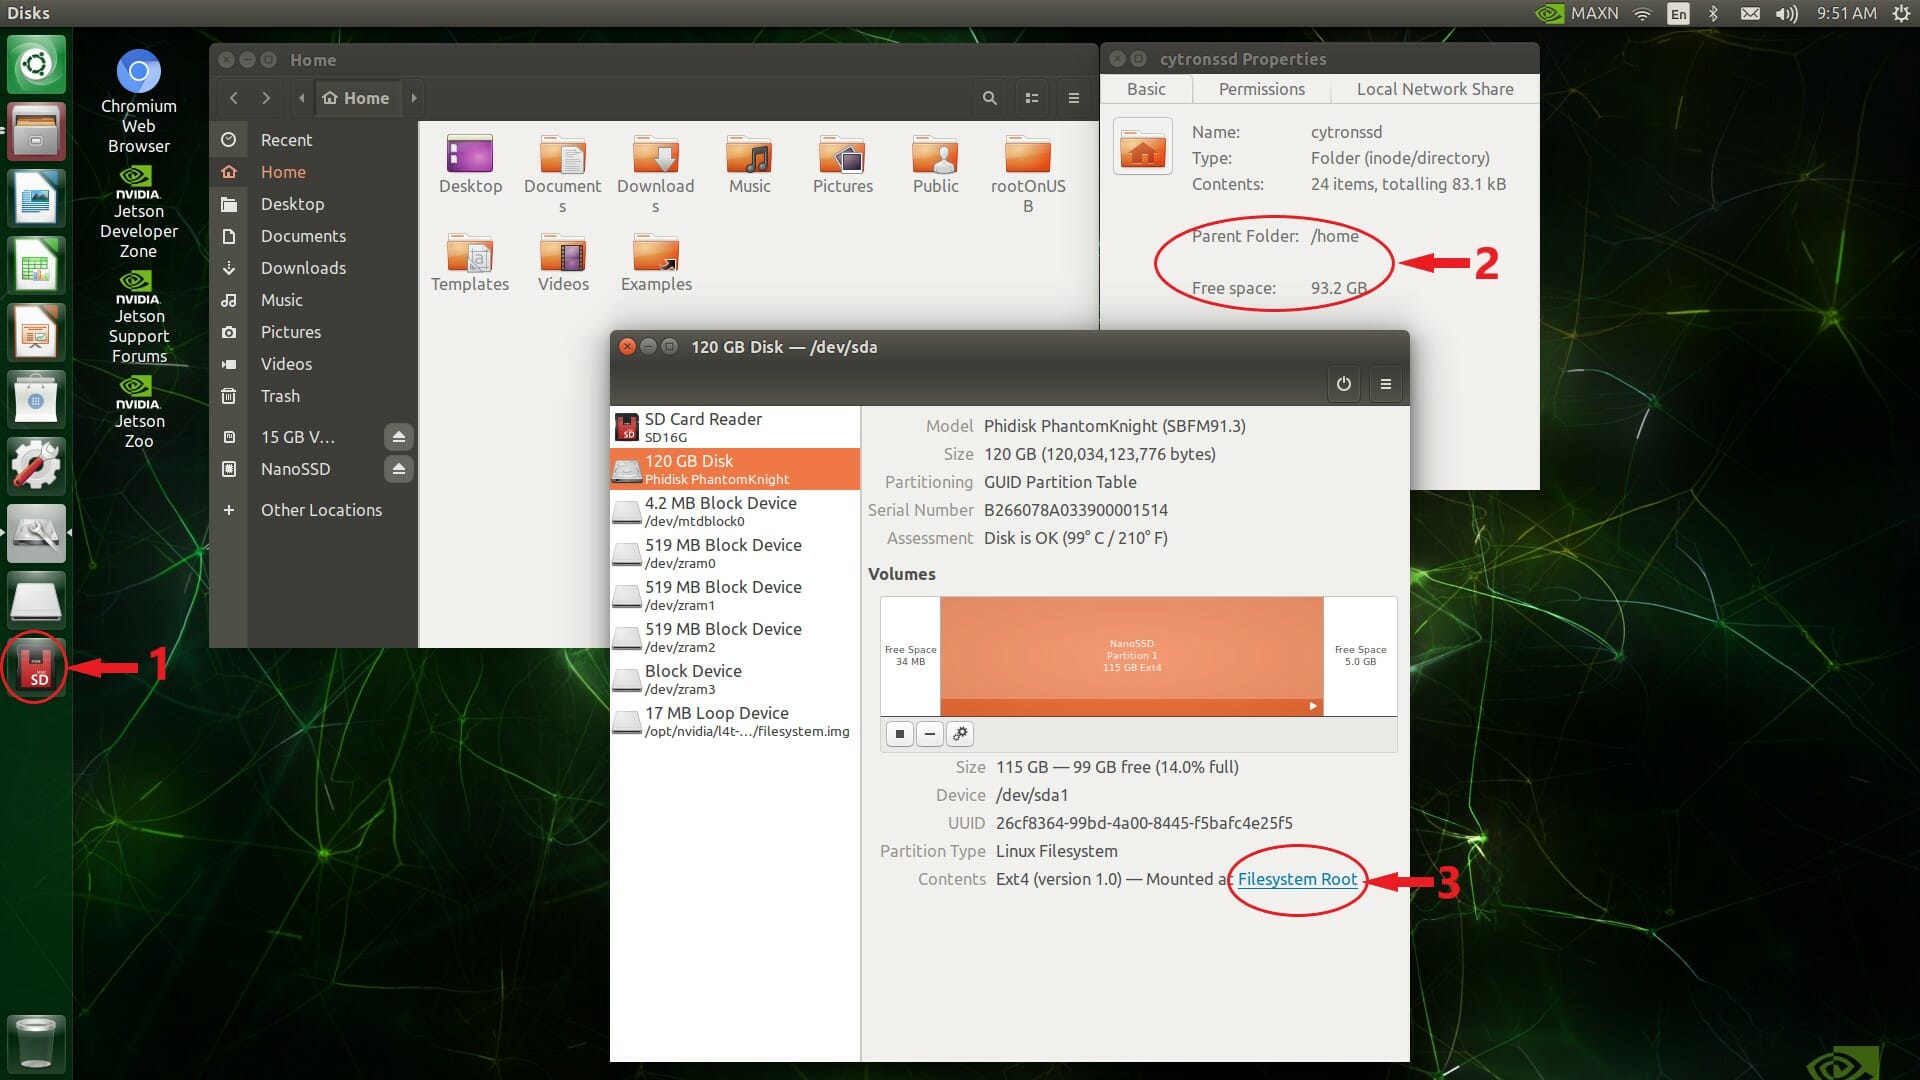
- The MicroSD card volume has been detected as an external device.
- The Home directory is now being referred to the USB drive with much more available free space!
- The USB drive volume partitioned is now being referred to as Filesystem Root.
Performance Test
DD command is being used to test the reading speed of Jetson Nano boot with MicroSD card and USB drive.
dd if=/dev/zero of=/tmp/laptop.bin bs=1G count=1 oflag=direct
MicroSD Card

USB Boot (SSD)

As you can see, the reading speed is increased by almost 9x in USB boot with SSD compared with the MicroSD card.
Note: The microSD card is still REQUIRED for the USB boot process. So do not remove it!
Have fun with your upgraded Jetson Nano ?