Introduction
Arduino can also be controlled by the Graphical User Interface (GUI). We create the GUI using Processing IDE. It’s quite easy to create the GUI. In this tutorial, we will create a simple GUI to control the Servo and display sensor’s reading on Arduino. The sensor can be any sensor, but in this tutorial we’re using Ultrasonic sensor.
Video
This video will show you how to create a user interface that can control a servo and display sensor’s reading on Arduino with Processing.
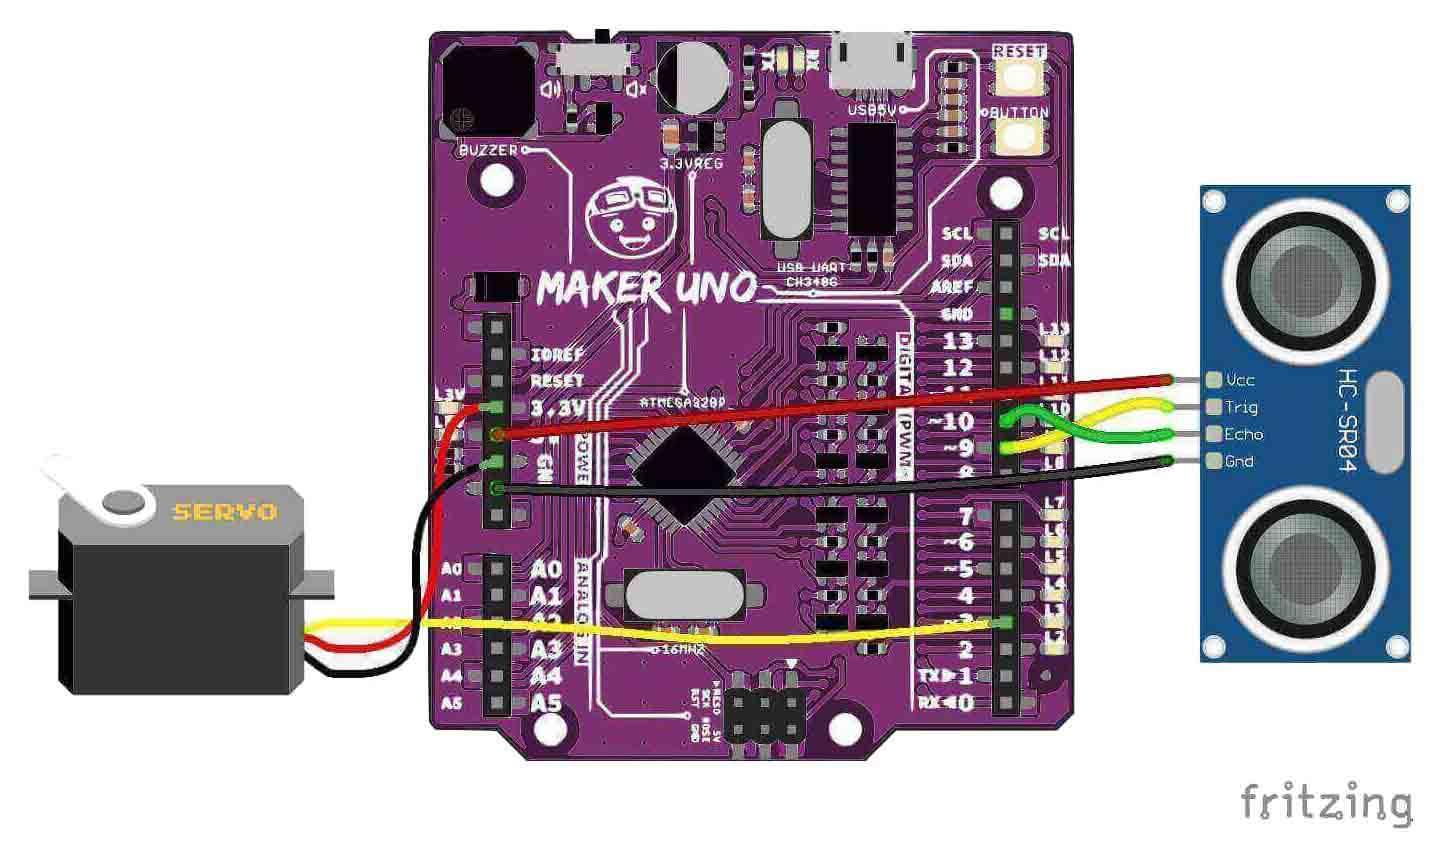
Hardware Preparation
This is the hardware connection and the components needed.

Sample Code
Arduino
#include <Servo.h> // Include the Servo library | |
int servoPin = 3; | |
const int trigPin = 9; | |
const int echoPin = 10; | |
Servo myServo; // Create a servo object | |
int val = 0; | |
long duration; | |
int distance; | |
void setup() { | |
myServo.attach(servoPin); | |
pinMode(trigPin, OUTPUT); // Sets the trigPin as an Output | |
pinMode(echoPin, INPUT); // Sets the echoPin as an Input | |
Serial.begin(9600); //start serial | |
} | |
void loop() { | |
digitalWrite(trigPin, LOW); | |
delayMicroseconds(2); | |
digitalWrite(trigPin, HIGH); | |
delayMicroseconds(10); | |
digitalWrite(trigPin, LOW); | |
duration = pulseIn(echoPin, HIGH); // Reads the echoPin, returns the sound wave travel time in microseconds | |
distance = duration * 0.017; // Calculating the distance | |
Serial.println(distance); | |
if (Serial.available()) { //Check data | |
int val = Serial.read(); | |
myServo.write(val); | |
delay(15); | |
} | |
} |
Processing
import processing.serial.*; | |
import controlP5.*; | |
Serial myPort; | |
ControlP5 cp5; | |
ControlGroup messageBox; | |
String data = "0"; | |
void setup() { | |
size(500,430); | |
myPort = new Serial(this, "COM5", 9600); // Change this to your port | |
myPort.bufferUntil('\n'); | |
cp5 = new ControlP5(this); | |
createMessageBox(); | |
} | |
void draw() { | |
Textlabel distanceValue = ((Textlabel)cp5.getController("distanceValue")); | |
background(#20acd6); | |
// Update distance to UI | |
distanceValue.setValue(data); | |
} | |
void createMessageBox() { | |
PFont pfont = createFont("Arial",20,true); // use true/false for smooth/no-smooth | |
ControlFont font = new ControlFont(pfont,14); | |
// create a group to store the messageBox elements | |
messageBox = cp5.addGroup("messageBox",50,50,400); | |
messageBox.setBackgroundHeight(330); | |
messageBox.setBackgroundColor(color(0,200)); | |
messageBox.hideBar(); | |
Button cytron = cp5.addButton("buttonA"); | |
cytron.setImages(loadImage("cytronSmall.png"), loadImage("cytronSmall.png"), loadImage("cytronSmall.png")); | |
cytron.setPosition(45,20); | |
cytron.moveTo(messageBox); | |
// add a TextLabel to the messageBox. | |
Textlabel label = cp5.addTextlabel("label","Drag the slider to control the position of the servo",45,160); | |
label.setFont(font); | |
label.moveTo(messageBox); | |
Slider slider = cp5.addSlider("slider"); | |
slider.setLabel(""); | |
slider.setSize(300,30); | |
slider.setPosition(50,180); | |
slider.setRange(0,180); | |
slider.setColorForeground(color(0,113,220)); | |
slider.setColorBackground(color(255,255,255)); | |
slider.showTickMarks(true); | |
slider.setNumberOfTickMarks(5); | |
slider.snapToTickMarks(false); | |
slider.setValue(90); | |
slider.moveTo(messageBox); | |
Textlabel distanceLabel = cp5.addTextlabel("distanceLabel","Distance:",270,240); | |
distanceLabel.setFont(font); | |
distanceLabel.moveTo(messageBox); | |
Textlabel distanceValue = cp5.addTextlabel("distanceValue","VALUE",270,270); | |
distanceValue.setFont(font); | |
distanceValue.moveTo(messageBox); | |
Textlabel unitLabel = cp5.addTextlabel("unitLabel","cm",300,270); | |
unitLabel.setFont(font); | |
unitLabel.moveTo(messageBox); | |
} | |
void serialEvent(Serial myPort) | |
{ | |
data=myPort.readStringUntil('\n'); | |
} | |
void slider(int slider) | |
{ | |
myPort.write(slider); | |
} |
References :
Thank you
Thank you for reading this tutorial and we hope it helps your project development. If you have any technical inquiry, please post at Cytron Technical Forum.