 International
 Singapore
 Malaysia
 Thailand
 Vietnam
Your shopping cart is empty!

5 Easiest Ways to Control A DC Motor
One of my friends was inspired by my previous article and decided to motorize his curtain blind. When I asked him how is he going to control the motor, he answered: Raspberry Pi.
He is an IT guy, writing a thousand lines of code within an hour is not a problem for him but it doesn’t mean he knows the best way to control the DC motor for his application. This leads to the idea of sharing what I know about controlling a DC motor for makers who is not familiar with motor control.
As a maker, “begin with the end in mind” is very important at the beginning of the design process. There are two important questions you need to answer before you decide how you want to control the motor.
1. Your Application
If you are building a mobile robot or an automation system in which the system involves multiple motors and sensors, then you probably need a controller (Arduino or Raspberry Pi) and motor driver.
In my friend’s case, a single DC motor is used to pull the blind’s string. This is pretty straightforward and should be able to accomplish with a switch unless he wants to add a remote control or voice control features like Amazon Echo.
2. The Motor’s Peak Current
A motor’s peak current is the highest current flowing from the power source to the motor which you can find the data from the motor datasheet. You need to ensure the switch or motor driver you are using is able to cope with the maximum current the motor can draw otherwise you will destroy the switch or motor driver.
From the video above, I am trying to show you how the switch is burnt due to the overcurrent flowing through the switch.
Let’s start with the simplest control method.
1. CONNECT DIRECTLY TO THE BATTERY
Overview: This is a straightforward method where we can connect the motor directly with a battery (or other DC power source) to rotate the motor. To reverse the rotation, just simply reverse the polarity of the motor.
Limitation: It is very inconvenient and not a common method because you need to connect the wire to the battery every time you want to run the motor. But it is okay to use this method to check the motor’s functionality.
2. CONTROL WITH A SWITCH
Overview: From method #1, we can actually add a switch between the motor and battery that allows us to do the same thing but in a more convenient way.
Limitation: This is only suitable for small motors with the small current because the switches in the market usually are unable to cope with high current. Furthermore, there might be a spark every time you trigger the switch which may cause further incidents.
Schematic:
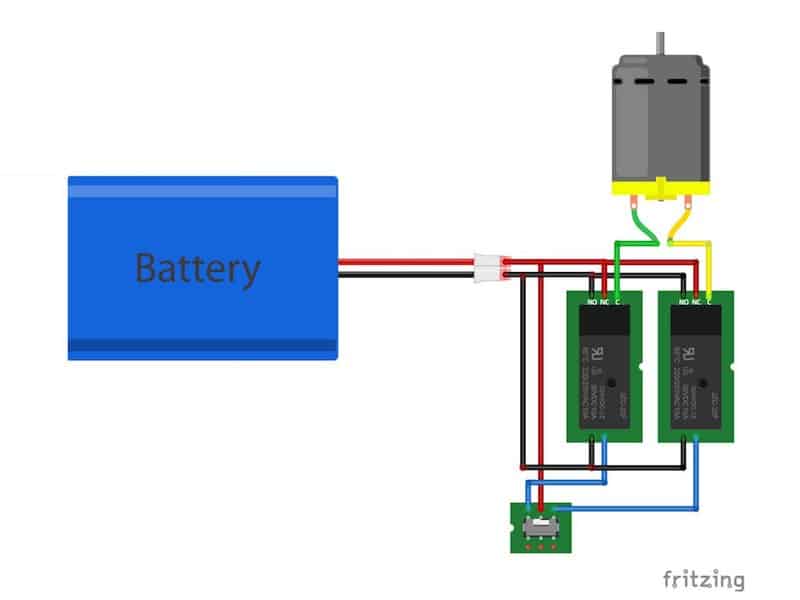
3. Control with relays + switch
Overview: To solve the spark problem in method #2, we can utilize a high-current relay to drive the motor. What we need to do is to trigger the relay (which usually consumes very little current) using a smaller switch or a microcontroller.
Limitation: Again, the limitation is at the relay’s current. 30Amp relay is the highest rate we can easily find in the market. Higher than that is not common and expensive.
Schematic:
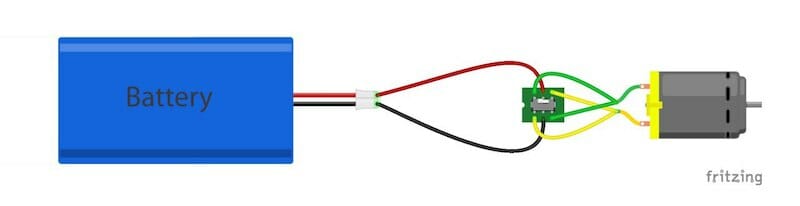
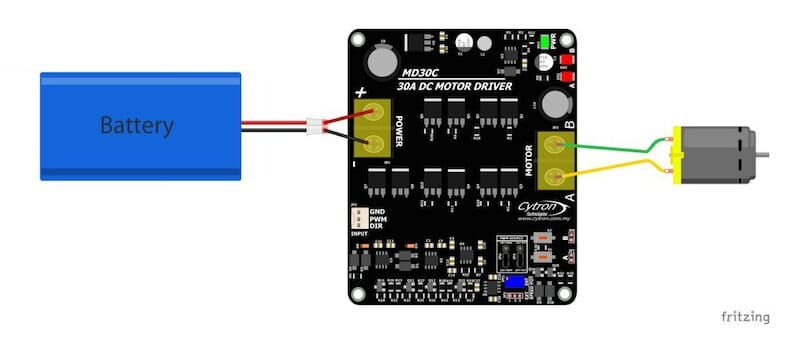
4. Control with motor driver + switch
Overview: You can control a high current motor (30 Amp and above) to run at a constant speed in clockwise (CW) and counter-clockwise (CCW) direction by only using a motor driver without a microcontroller. Although it is uncommon but there is nothing wrong with this method if you cannot get a high current relay or you don’t want to get your hand dirty by putting the relay’s circuit works.
Limitation: All controls are done manually. You are unable to perform complicated control such as controlling the motor direction and speed based on the sensors’ signals or reading the motor’s current position and temperature while the motor is running.
Schematic:
5. Control with motor driver + microcontroller
Overview: You can control a motor with a timer, sensors or remotely control it via Bluetooth or wifi. You can change the motor direction and speed when the microcontroller receives different signals from your sensors. The best example of this method is an automatic mobile robot.
Limitation: It looks complicated for a beginner to control a DC motor using a microcontroller but the good news is we have a tonne of tutorials and example guides to guide you. Pick a tutorial that close to your application from the list below, spend some time reading through and follow the guides step by step, I’m sure you will be able to make it happen!
- Controlling 10A DC motor driver using Arduino Nano
- Getting started with 3A motor driver shield and Arduino Uno
- How to develop Arduino line following mobile robot
- Raspberry Pi: Control DC motor using MDDS10
- Control a mobile robot via Android Bluetooth
Conclusion
A microcontroller is an extra cost to your project and you need to know how to use it. Unless it is necessary, otherwise it is more straightforward to use method #2- #4 to control a DC motor.