 International
 Singapore
 Malaysia
 Thailand
 Vietnam
Your shopping cart is empty!

SK40C vs CT-UNO
- geneccyann
- 12 Mar 2015
- 568
What is SK40C?
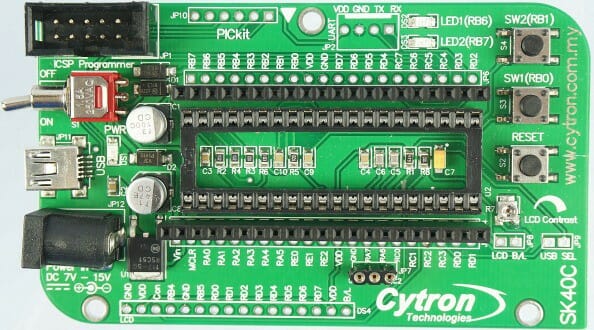
Cytron’s SK40C is a 40 pins PIC microcontroller starter kit designed to offer an easy-to-start solution for PIC microcontroller(PIC MCU) user. Users are able to utilize the function of PIC by directly plugging the I/O components in whatever way that is convenient to them.
What is CT-UNO board?

CT-UNO is a microcontroller board which contains all the amazing features of an Arduino UNO. The CT-UNO combines the simplicity of the UNO Optiboot bootloader (which load program faster), the stability of the FTDI and the R3 shield compatibility of the latest Arduino UNO R3. There are a few modifications on the this UNO to create a better performance for the satisfaction of the user.
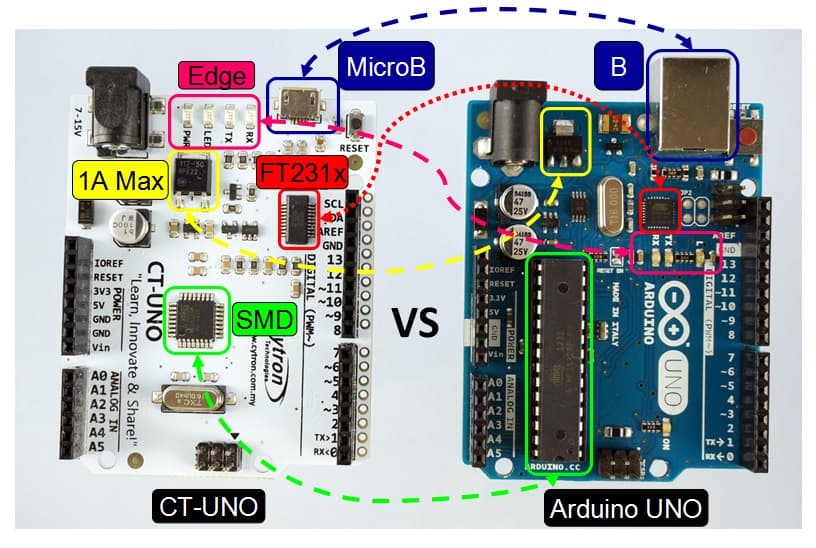
Modifications:
- The USB port connecting the UNO to the computer is changed from B to MicroB as MicroB USB port is more commonly used.
- The voltage regulator used have a higher maximum current of 1A. Thus, UNO can transmit higher current for the output.
- The LEDs are rearranged at the edge for better view, in cases where a shield is used.
- A SMD model of the ATmega328p instead of PDIP model which save a lot of spaces.
- FT231x i.e. a USB 2.0 high speed IC which causes USB to be added into a system design quickly and easily over a UART interface whilst Arduino uses a microcontroller for UART interface which has a slower process speed. From experiences, FT231x is more stable
If you are interested to purchase this awesome product, please click here for more information.
SK40C or CT-UNO?
CT-UNO is an all-in-one tool embedded with a specific microcontroller, UART communication, crystal oscillator, USB programmer and 14 I/O pins as well as 6 analog pins. The SK40C however, is not inclusive of those that were mentioned above. Most of the components i.e. PIC microcontroller, crystal oscillator, UART communication and USB programmer (UIC00B/UIC00A) need to be connected manually, but the SK40C offers a wider range of I/O pins compared to the CT-UNO which limit to 16 I/O pins.
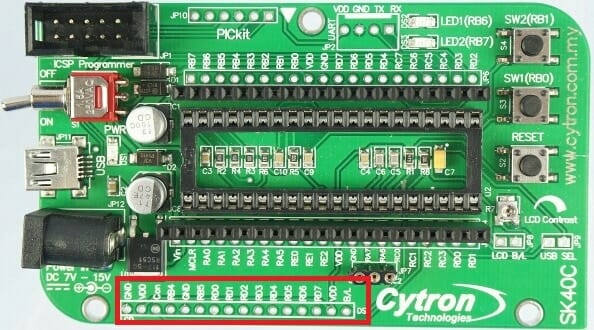
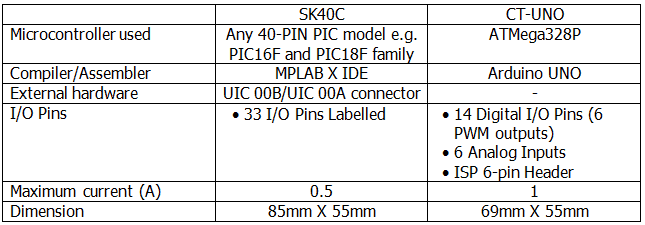
You can also solder your LCD display into the pins provided as shown in the figure above. This saves more time and the number of I/O pins on the microcontroller whilst the CT-UNO cannot do that. The table below shows the basic contrast between the SK40C kit and the CT-UNO.
Programming
I am going to use the example code provided by ARDUINO to demonstrate the difference between the MPLAB IDE X and the ARDUINO IDE assembler. I am using MPLAB IDE X V2.35 and ARDUINO 1.6.0.
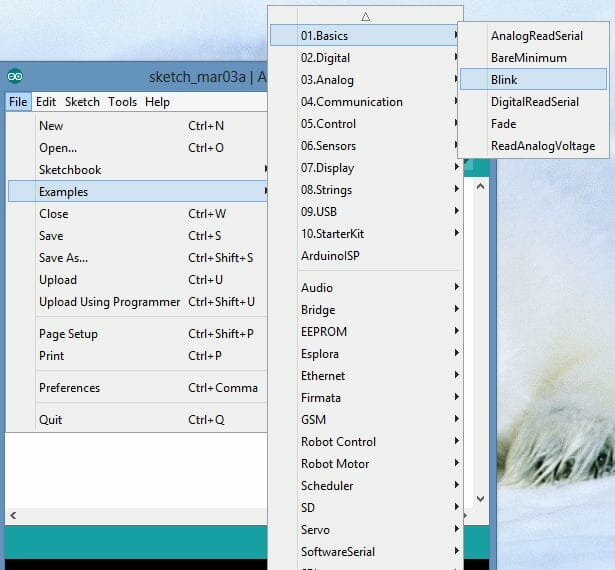
1. Arduino 1.6.0
Code overview:
[code lang=”c” highlight=””]

// the setup function runs once when you press reset or power the board
void setup() {
// initialize digital pin 13 as an output.
pinMode(13, OUTPUT);
}

// the loop function runs over and over again forever
void loop() {
digitalWrite(13, HIGH); // turn the LED on (HIGH is the voltage level)
delay(1000); // wait for a second
digitalWrite(13, LOW);// turn the LED off by making the voltage LOW
delay(1000); // wait for a second
}[/code]
Here are the list of commands used in the code:
- pinMode – This command sets the pin number as input or output.
- digitalWrite – This command sends logic HIGH or LOW to the pin number stated.
- delay – This is a built-in function to create a delay of 1ms
After completing the code, click the tick button to verify the code.
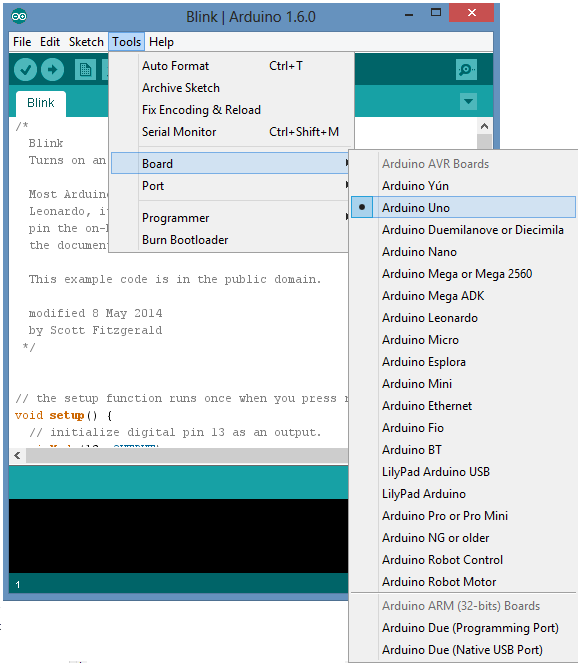
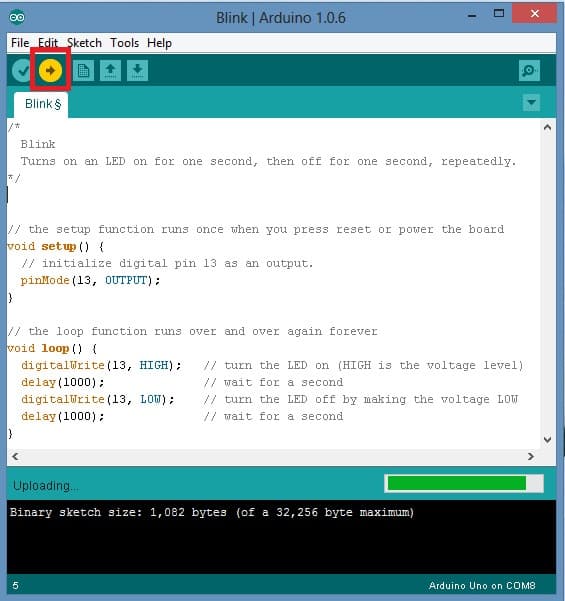
Then choose the correct board, correct serial port and upload the code into the UNO. Here, I am using Arduino UNO board. After it is done uploading, you are done!
2. MPLAB X IDE V2.35
As highlighted, SK40C can support many PIC model, just to name a few:
- PIC16F877A
- PIC16F887
- PIC16F1937
- PIC18F452
- PIC18F4520
- PIC18F458
- PIC18F4580
- PIC18F4550
- ….. and the list go on and go…. every PIC16F and PIC18F (from Microchip) which is 40-pin in PDIP package can be used on SK40C.
Since SK40C can support many PIC model, many IDE and programming language can be used. Example of possible IDE: MPLAB IDE, MPLAB X IDE, MikroC, CCS, Pinguino and many more possible. We are using MPLAB IDE and MPLAB X IDE, why? Because both these IDE are from Microchip, the designer and producer of PIC microcontroller, and they are free As for compiler, we are using MPLAB XC8 (Hi-TECH and MCC18 previous). Hold on…. isn’t there any standard IDE and compiler like Arduino? Unfortunately, yes, example Pinguino itself is IDE with compiler which have Arduino alike interface and library. Anyway, just to give you an idea, SK40C is a hardware platform to support 40-pin PIC, you are free to choose the IDE and Compiler you like!
I will be showing you example of setting up the MPLAB X IDE with XC8 C Compiler. If you are unfamiliar of the steps, please click here to get started with MPLAB. I will be using the example from this tutorial. Make sure to follow all these steps before building and running your project. You can also go here to try out more examples with SK40C.
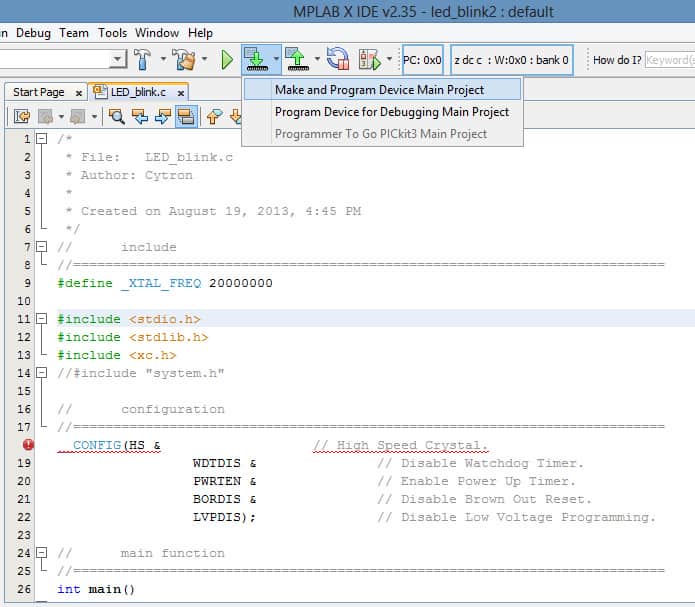
Code overview:
[code lang=”c” highlight=””] #define _XTAL_FREQ 20000000 #include stdio.; #include stdlib.h; #include xc.h; //#include “header.h” // configuration //========================================================================== __CONFIG(HS & // High Speed Crystal. WDTDIS & // Disable Watchdog Timer. PWRTEN & // Enable Power Up Timer. BORDIS & // Disable Brown Out Reset. LVPDIS); // Disable Low Voltage Programming. // main function //========================================================================== int main() { ADCON1 = 0x07; // configure all I/O pins to digital pin // Initialize the I/Os. // There are 5 IO Ports on PIC16F877A (40 pin) // User is needed to initiate all I/O pin according to schematic //Most of un-use I/O is being configured as Input // Initialize the I/Os. TRISA = 0; TRISB = 0; TRISC= 0; TRISD = 0; TRISE = 0; // Initiate value for output pin PORTA = 0; PORTB = 0; PORTC = 0; PORTD = 0; PORTE = 0; while(1) { RB3 = 1; __delay_ms(1000); RB3 = 0; __delay_ms(1000); } return 0; } [/code]
Here are the list of commands used in this code:
- CONFIG – This part is to configure the things that you need and you don’t need. You can also do this in the header file and use command #include “header.h”
- TRIS – This command is similar to pinMode in arduino, where you set the pins as INPUT or OUTPUT. For input, ‘1’ should be added while for output ‘0’ is added.
- PORT – This command is similar to digitalWrite in arduino, where you send the logic ‘1’ (HIGH) or ‘0’ (LOW) to the pin number stated.
- __delay_ms – This is a built-in function similar to delay function in arduino of 1ms.
Compare and contrast:
So, which do you prefer? SK40C or CT-UNO? We can clearly see that Arduino IDE is more user friendly compared to MPLAB IDE. The commands are easier to understand too. In the MPLAB IDE, you need to set up a few things before running the code but, in ARDUINO IDE, you can straight away key in your code, compile and upload! It is just as easy as that.
All in all, SK40C offers flexibility whilst CT-Uno offers simplicity.
Thank you for reading! I hope you gained something from this tutorial!