 International
 Singapore
 Malaysia
 Thailand
 Vietnam
Your shopping cart is empty!

Remote Control FM Stereo Radio
Nowadays, FM radio frequency had already become common for communication use. It use for data transfer, Medical treatment, cosmetic treatment and more. Radio frequency (RF) is a rate of oscillation in the range of around 3 kHz to 300 GHz, which corresponds to the frequency of radio waves, and the alternating currents which carry radio signals. Today, we are going to experience the common FM radio freq, BUT, not by using the big radio. We are going to use a single-chip electronically tuned FM stereo radio which is TEA57657 with some support components. To ease user from headache to collect all the support components, we had come out FR02A!!
HARDWARE
- Arduino Uno (Link)
- Cytron Prototyping Shield (Link)
- IR Remote Control Kit (Link)
- FR02A (Link)
- LCD Keypad Shield (Link) [Optional]
- Amplified Speaker or earphone
SOFTWARE
HARDWARE SETUP
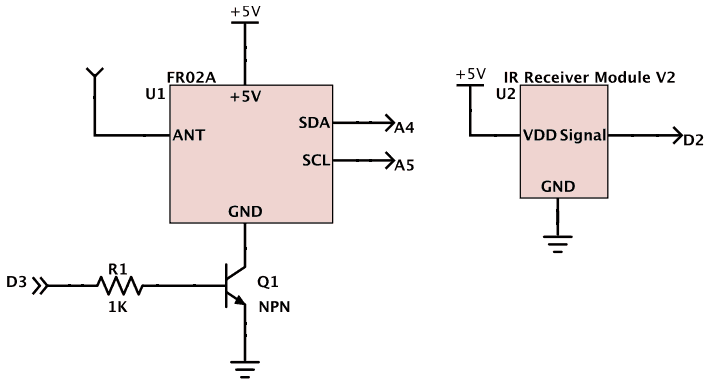
- Solder the FR02A to the prototype shield and IR Receiver to the Prototyping Shield as the schematic below.
**Make sure the FR02A Audio Jack is face outside the board in order to insert the Audio header.
UPLOAD THE ARDUINO SKETCH
- Download the code as in the attachment.
- Choose the Arduino Uno board
- Select the correct COM port.
- Click Upload icon.
THE CODE
[sourcecode language=”cpp” wraplines=”true”]
#include
#include
#include
#include
#include

int RECV_PIN = 2;
const int ON_OFF = 3;
[/sourcecode]
Since we are using the IR Remote, It will be much easier to use back the library provided. In this tutorial, I had connect the IR Received signal pin (RECV_PIN) to Arduino Digital Pin 2. And the NPN Base to Digital Pin 3.
[sourcecode language=”cpp” wraplines=”true”]
// FM Freq below are North FM Freq
#define Hitz 92.8
#define Mix 91.0
#define NineEightEightFM 94.5 // 988 FM
#define RedFM 98.1
#define FlyFM 89.9
#define LiteFM 104.4
#define MyFM 99.7
#define MelodiFM 106.5
#define HotFM 88.2
#define SinarFM 97.1
[/sourcecode]
Above is the Preset frequency in Northan area FM frequency to each of the Remote control Button. Set your location FM radio Frequency to enjoy.
[sourcecode language=”cpp” wraplines=”true”]
void loop() {
if (irrecv.decode(&results)) { //Check if IR receive anything

if(results.value == 16580863) { // ON OFF Button
if(ONOFF == OFF) { // If the FR02A is OFF
digitalWrite(ON_OFF, HIGH); // ON FR02A
ONOFF = ON;
lcd.clear();
}
else {
ONOFF = OFF; // OFF FR02A
digitalWrite(ON_OFF, LOW);
lcd.clear();
}
}
[/sourcecode]
In this part, Check the IR Receiver if it receive any signal and decode it. Below are the Hex and Decimal number for the button that use in this project. In order to identify each button Hex/DEC, load the IRrecvDemo.ino to identify.
[sourcecode language=”cpp” wraplines=”true”]
// HEX DEC Button
// FD00FF 16580863 // ON_OFF
// FD30CF 16593103 // 0
// FD08F7 16582903 // 1
// FD8877 16615543 // 2
// FD48B7 16599223 // 3
// FD28D7 16591063 // 4
// FDA857 16623703 // 5
// FD6897 16607383 // 6
// FD18E7 16586983 // 7
// FD9867 16619623 // 8
// FD58A7 16603303 // 9
// FD20DF 16589023 // << // FD609F 16605343 // >>
[/sourcecode]

[sourcecode language=”cpp” wraplines=”true”]
if(ONOFF == ON) {
if(results.value == 16593103) { // 0
radio.setFrequency(Hitz); // Set Frequency
lcd.clear();
lcd.cursorTo(1, 0);
lcd.printIn(“Hitz FM”);
}
[/sourcecode]
After identify which button is pressed, and the FR02A is ON, send the desired FM frequency to the FR02A and EnJoY!!!! :D