 International
 Singapore
 Malaysia
 Thailand
 Vietnam
Your shopping cart is empty!

Good! You are here because you wanted to use Arduino. 1st thing 1st, you will need the necessary tools to get started.
- Arduino Main Board (There are plenty of Arduino main boards in the market)
- USB cable and UC00A Rev2.0 for loading program. Some Arduino Main board comes with the USB cable, but some do not :)
- Arduino IDE
- Breadboard (Optional)
ARDUINO MAIN BOARD
Currently, there are > 10 types of Arduino main boards in the market including 3rd party, compatible versions, etc. We will not cover all. I will focus on BBFuino, Breadboard Friendly Controller (Arduino compatible). Other types of Arduino main boards have the basic operation, with a little tuning and exploring, I am sure you can get the hang of it. If you have any problems, welcome to discuss it in our technical forum. You can also refer to:
- Getting Started with Arduino UNO
- Getting Started with Arduino Leonardo
- Getting Started with Arduino Mega ADK
- Getting Started with Arduino – PRO Mini
- Getting Started with Arduino Fio
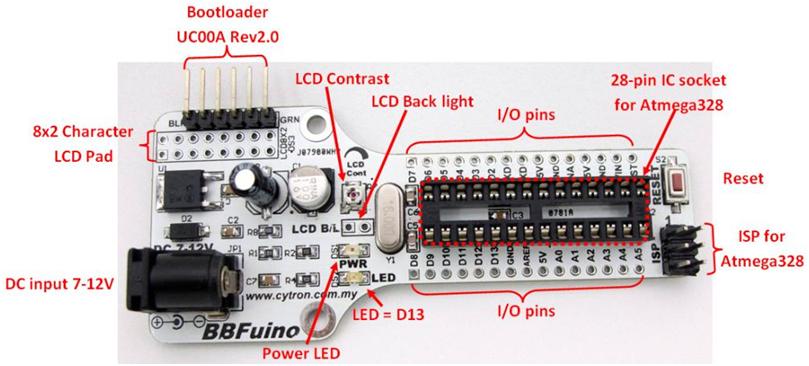
UC00A REV2.0 OR COMPATIBLE DEVICE
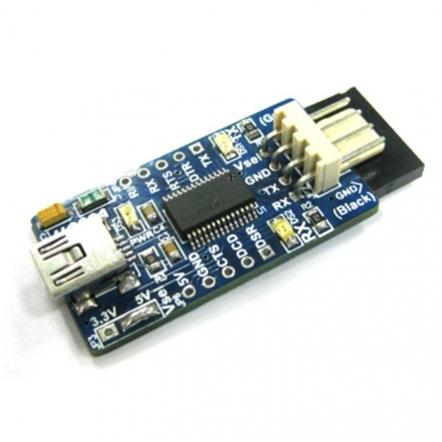
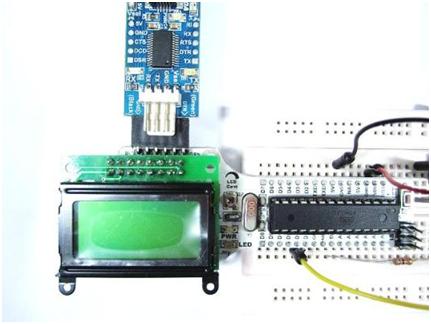
BBFuino is an Arduino-compatible controller without the programming device installed on it. This is to reduce the cost of BBFuino because the programming device can be reused for other BBFuino or Arduino controllers, and is quite common. This is similar to PRO Mini and Fio. Therefore, you need to get a tool to load the program, we have that tool, the UC00A Rev2.0. Basically, it is a USB to UART bridge. Arduino uses a serial bootloader to load programs into the target Arduino board. UC00A Rev2.0 comes with the socket ready for BBFuino
USB CABLE
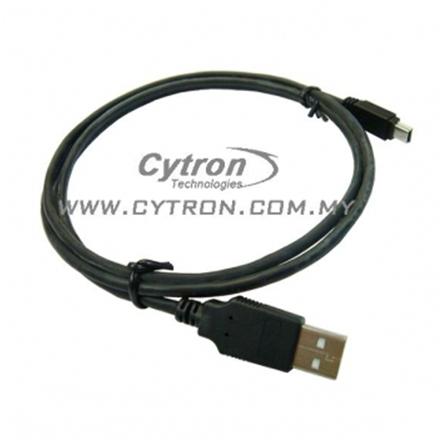
UC00A Rev2.0 will require a USB mini B cable. The cable is for connecting UC00A Rev2.0 to a computer for loading a program to BBFuino, in some cases for power, and also for serial communication. BTW, the USB mini B cable is commonly used on UIC00B, GPS, SKXBee Rev2.0, and Motorola phones. Try using those USB cables if you have one.
ARDUINO IDE
Arduino IDE is the software tool needed to write sketch (code), and load them into the Arduino main board. Please go to the Arduino website at arduino.cc, under Download, please download the corresponding IDE base on your Operating system (Windows, Mac OS X, Linux). This is the location to download the latest version of Arduino IDE.
Unzip the downloaded file.
ARDUINO MAIN BOARD TO COMPUTER
Now, since this is your 1st time, it is always going to be painful, right? BTW, I will be showing the steps using Windows XP only :) Connect one end of the Mini B type USB cable to UC00A Rev2.0 and the other end to the computer/laptop USB port. The UC00A Rev2.0 will automatically use the power from the USB to start up. The green LED (ON) on UC00A should be ON and. 1st time user, you will need to install the USB driver for UC00A Rev2.0. You should also hear a sound from the computer and a little popup message box at the bottom right corner of the screen saying Found New Hardware…..FT232…. you will need to install the driver :)
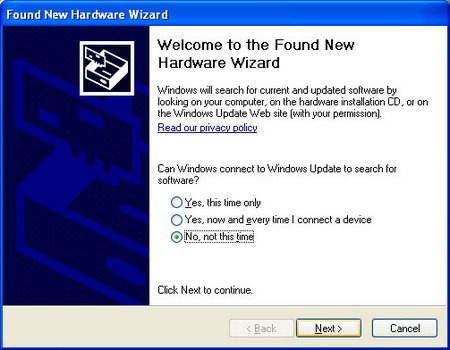
The Found New Hardware Wizard will appear please select No, not this time and click Next >
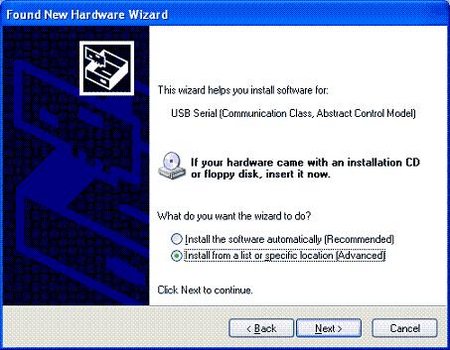
Select Install from a list of specific locations (Advanced) on the next screen. Click Next >
On the next screen, make sure you select Include this location and browse to the Arduino IDE folder that you just downloaded and unzipped. Select the drivers -> FTDI USB Drivers folder, and click OK. The wizard should start searching for necessary files and install the driver, you should get this window, and click Finish.

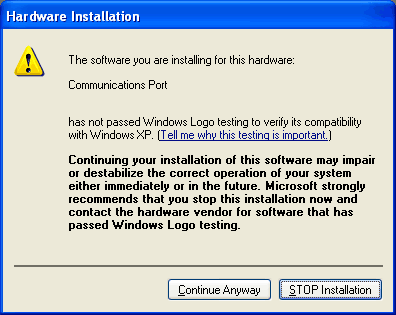
You might get this warning message pop up, just click Continue Anyway.
And it should install successfully and you will get this:

you might need to reboot/restart the computer to get the driver working properly, don’t worry, it’s only one-time work! After the computer reboot, please make sure the UC00A Rev2.0 is plugged into the computer through the USB cable. The green LED is ON. We would like to know which COM number is the UC00A Rev2.0 connected to. Go to the Device Manager (from the Start Menu, select Settings -> Control Panel. Double Click on System and select Hardware tab. Then click on Device Manager).
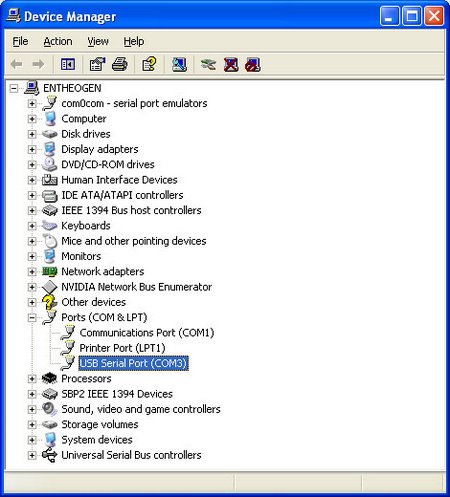
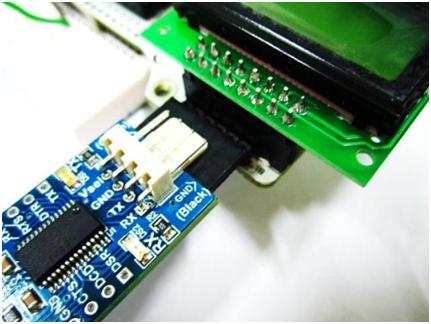
Look for an entry under Ports (COM & LPT) that shows USB Serial Port (COM "X") where X is a decimal number from 1 to 100. Seriously, I have seen COM72 before! Anyway, the X can be any number and it should be a unique number and we need it in Arduino IDE later. So in this case, the COM number is 3. You will need to select the correct COM number to load the program/sketch into BBFuino later. If you don see any USB Serial Port, unplug the USB cable and plug it in again. Now, the driver for UC00A Rev2.0 is installed. Connect the UC00A Rev2.0 to BBFuino. Remember, check the polarity for this connection. Make sure the GND (Black) on UC00A is connected to the BLK pin on BBFuino, and the DTR (Green) is connected to the GRN pin on BBFuino. Double-confirm before you plug in. The LCD is optional.
From top
From side
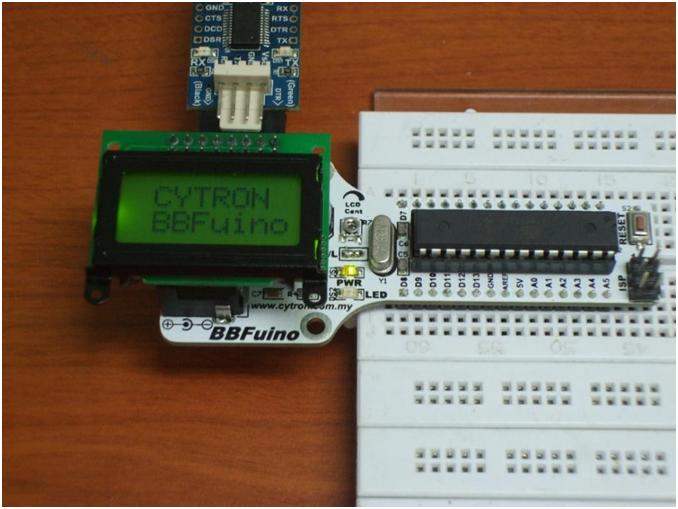
Once the UC00A is connected to the computer (via USB cable) and to BBFuino properly, the PWR LED on BBFuino will be ON. BBFuino is preloaded with a bootloader and a simple program where it will blink the Red LED too. If you install the 8×2 LCD, you will see some messages. Do not worry, even without an LCD, the tutorial will still go on. Now is the time we load 1st sample program/sketch.
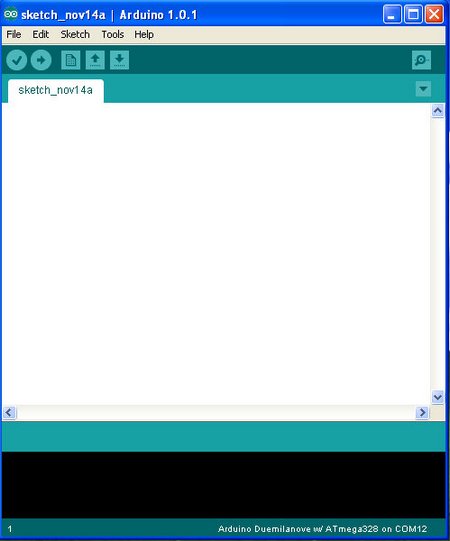
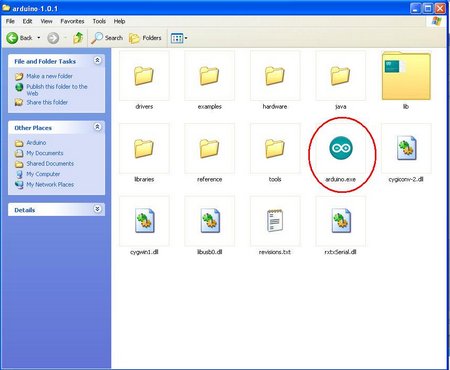
Good, the pain is over :) Let’s move to the fun part. Plug your BBFuino onto Breadboard. We will do Hello World in Arduino – LED blinking. Open the folder Arduino that you download and unzipped, you should see a file named arduino.exe, double click it, and Arduino IDE will appear, it may take a while to load, ~ 10 seconds. No further installation is needed. Arduino IDE does not require installation.
This is the Arduino IDE:
Make sure the UC00A Rev2.0 is connected to the computer and BBFuino. Arduino IDE supports many Arduino main boards. We will need to select the correct board and microcontroller. Goto Tools -> Board -> Arduino
UNO, click it.

Now, make sure Arduino IDE knows which COM Port the BBFuino is connected to. Goto Tools -> Serial Port -> COM?, it depends on the COM number you checked from the device manager, make sure you select the same COM number. Remember, the number might be different when you use different USB ports, change different UC00A, and different computers. Again, mine is COM3. Do not follow my COM number, choose yours.
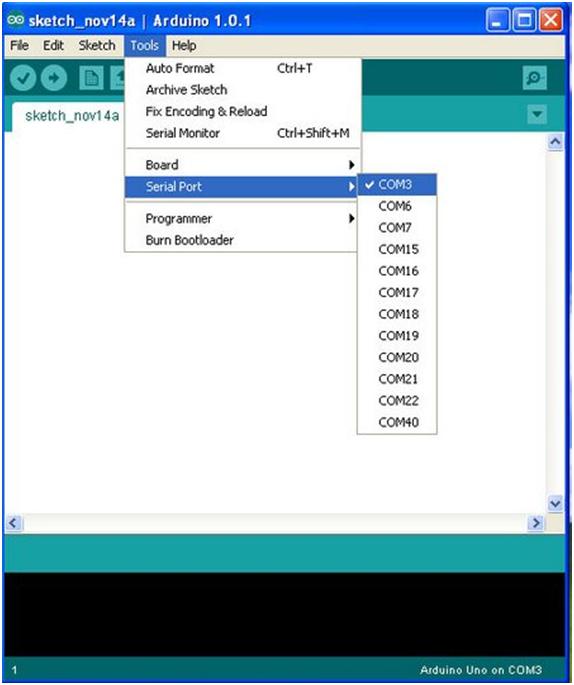
The settings will appear at the bottom right corner of Arduino IDE.
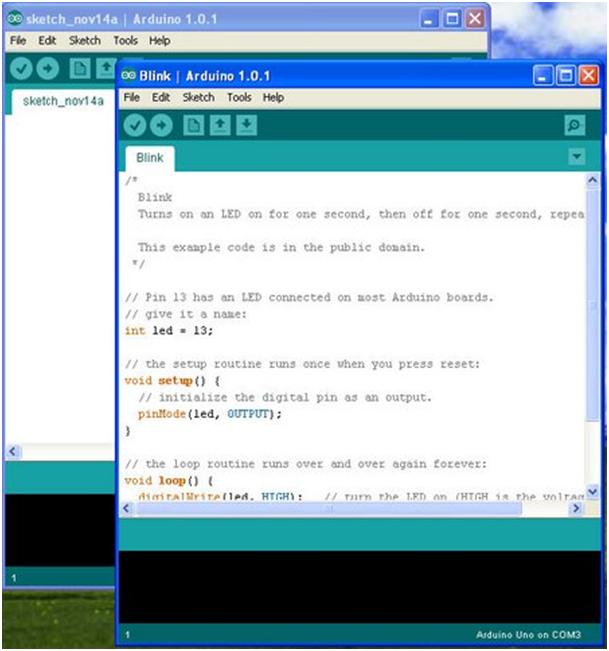
Now, you are ready to load the 1st example code, Blinking :) Goto File -> Examples -> Basic -> Blink, click it. The example sketch/program will appear in a new Arduino IDE window, don’t worry, it’s perfectly normal. You can ignore the empty Arduino IDE that appeared earlier. You can close it or leave it. We will work on the new Arduino IDE with Blink sketch.
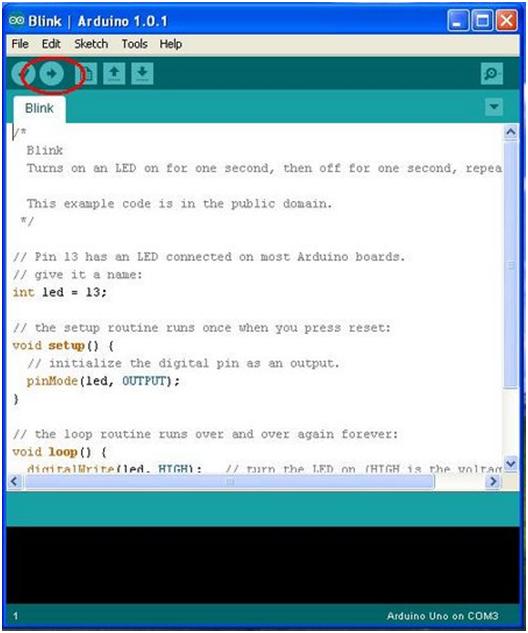
You can click the upload icon, Arduino IDE will compile the sketch and upload it into BBFuino connected to your computer (if there is no error), further run the sketch on BBFuino. You will just have to wait until the message box says Upload Done and look at the BBFuino. The Green LED (top right corner, top of Reset button) will Blink at a 1-second rate. That LED is connected to D13 of BBFuino.
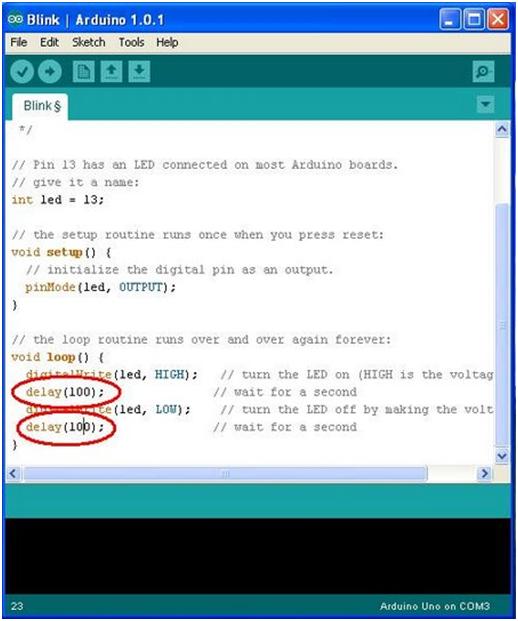
So we have downloaded a new sketch/program into our BBFuino, congrats! You have completed the 1st and foremost exercise. To make a few changes, I will show you an easy modification. Scroll down the program/sketch, in the loop function. Modify the value from delay(1000) to delay(100), for both the delay. Click on the Upload icon and sit back, waiting until it is done uploading.
Now, look at the Red LED blinking rate, it has become faster :) You have successfully loaded an example code/sketch and modified it. Hurray! You can try the other examples, but most will require additional shields or components. Just a reminder, BBFuino is designed to be breadboard friendly, it is not compatible with shields because of the size and shape, but all the sample code using Arduino IDE can work as long as the interface is correct. You can also check out the other tutorials using BBFuino:
- BBFuino – Display Temperature from LM35
- Controlling Digital Infrared Sensor with BBFuino and SK28A
- Interfacing BBFuino with BlueBee
- Communicate between BBFuino and SK28A by using RF-TRX-2.4G
We will come out with more tutorials, stay tuned! If you have a problem do feel free to discuss it in our technical forum as we seldom check the comments area on the tutorial site.