 International
 Singapore
 Malaysia
 Thailand
 Vietnam
Your shopping cart is empty!
 (SN-LM35DZ)")
Getting Started with Temperature Sensor (Celsius) (SN-LM35DZ)
Last Updated on 6 July 2017
This article is written by internship student Tian Fu Loke
INTRODUCTION
The LM35 temperature sensor is an integrated circuit sensor that gives an analog output proportional to the temperature in Celsius. You can download the datasheet here.
FEATURES
- Calibrated Directly in Celsius (Centigrade)
- Linear + 10-mV/°C Scale Factor
- 0.5°C Ensured Accuracy (at 25°C)
- Rated for Full −55°C to 150°C Range
- Suitable for Remote Applications
- Low-Cost Due to Wafer-Level Trimming
- Operates from 4 V to 30 V
- Less than 60-µA Current Drain
- Low Self-Heating, 0.08°C in Still Air
- Non-Linearity Only ±¼°C Typical
- Low-Impedance Output, 0.1 Ω for 1-mA Load
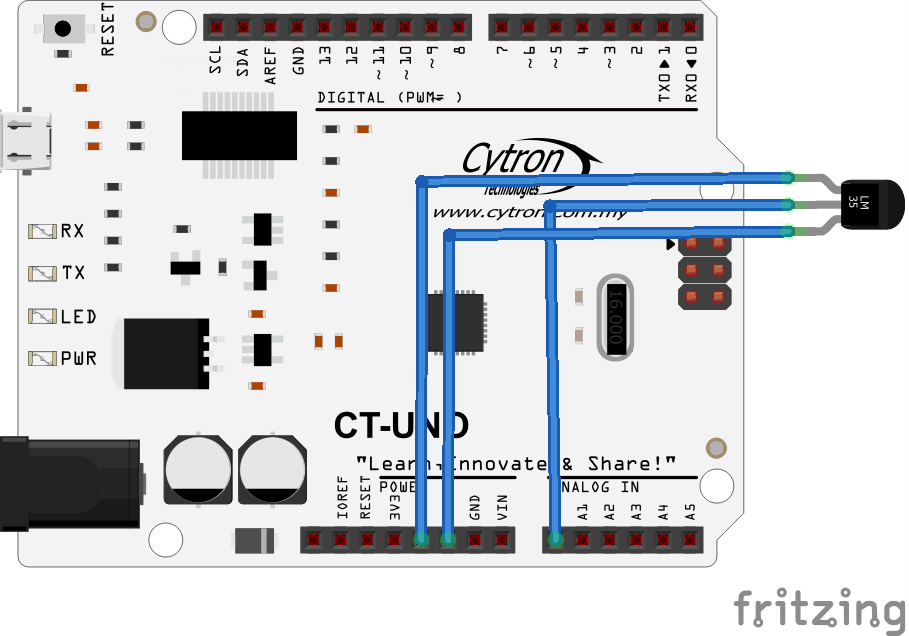
| PINS | DESCRIPTION |
| VCC | Voltage requirement 4-20V to operate (it can directly connect to Arduino 5V to used) |
| OUT | Connect to the Arduino analog pin |
| GND | Connect to the ground of Arduino |
HARDWARE REQUIREMENT
- Arduino Uno/CT-UNO
- LM35 Temperature Sensor
- USB Cable
- Jumper Wires
- LED
SOFTWARE REQUIREMENT
HARDWARE SETUP
- Take out your Arduino and components.
- Build your LM35 temperature sensor on the breadboard.
- Using jumper wire to connect between sensor and Arduino UNO/CT Uno
- Connect the sensor Vcc to Arduino 5V, GND TO ARDUINO GND and the output pin connected to the analog pin of Arduino.
SAMPLE CODE
int ldrPin = 7;
int value = 0;
float voltage = 0;
float temp = 0;

void setup ()
{
Serial.begin(9600);
}

void loop ()
{
value = analogRead(A0);      // sensor output to arduino analog A0 pin
voltage = value*0.00488;
temp = voltage*100;
Serial.print("TEMP:");
Serial.println(temp);

delay(500);
}
VIDEO
Note: For further inquiry, please visit our technical forum as we seldom check the comment here.