International
 Singapore
 Malaysia
 Thailand
 Vietnam
Your shopping cart is empty!

Introducing CIKU!
- Idris Zainal Abidin
- 30 Jun 2014
- 356
We believe many PIC microcontroller lover like to utilize Arduino shield, so here comes the CIKU. CIKU is a microcontroller board based on the PIC18F4550. It has 20 digital input/output pins (of which 2 can be used as PWM outputs and 6 as analog inputs), a 20 MHz crystal oscillator (clock speed up to 48 MHz after PLL), a mini USB connection, a power jack, a standard Arduino IO header, a PICkit header, a bootloader switch and a reset button. Besides focus on hardware solution, We also prepare basic library of pinMode, digitalWrite, digitalRead, analogWrite, analogRead and more base on XC8 compiler. So, at least you can write the Arduino language style on Microchip MPLAB X IDE.
FEATURES
Microcontroller: PIC18F4550
Operating Voltage: +5Vdc
Input Voltage (recommended): 7 – 12V
Input Voltage (maximum): 6 – 15V
Digital I/O Pins: 20
PWM Channels: 2
Analog Input Channels: 6
DC Current per I/O Pin: 25 mA
DC Current for 3.3V Pin: 500 mA
Flash Memory: 32 Kbytes (PIC18F4550) of which 4 KB used by bootloader
SRAM: 2 Kbytes (PIC18F4550)
EEPROM: 256 bytes (PIC18F4550)
Clock Speed: 48 MHz (PLL)
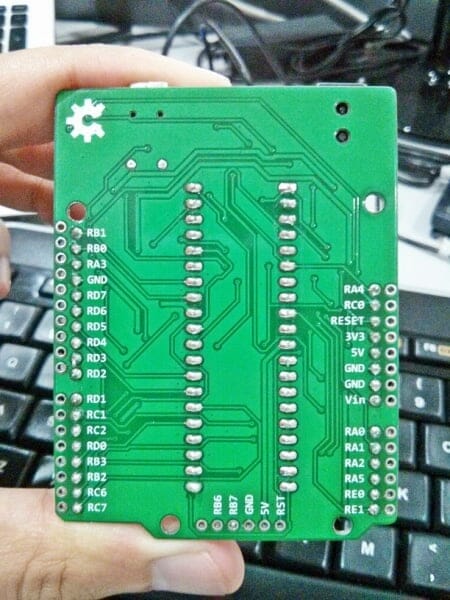
PIN MAPPING
For those who are familiar with PIC18F4550 IO pins, here we share the pin mapping. We try to arrange the IO pins to be Arduino compatible, but for sure not 100% compatible. However, for now, this is the best arrangemnet.
PROGRAMMING
Instead of hardware compability, programming become the most important part too. We want user to feel easy to start with CIKU. We try to make a library that looks like Arduino language style, but still there have a limitation since XC8 compiler only support for C, not C++.
LED blinking code example:
#include “Arduino.h”

void setup()
{
pinMode(LED, OUTPUT);
}

void loop()
{
digitalWrite(LED, HIGH);
delay(1000);
digitalWrite(LED, LOW);
delay(1000);
}
Serial (UART) code example:
#include “Arduino.h”
#include “HardwareSerial.h”

void setup()
{
Serial_begin(9600);
}

void loop()
{
while(Serial_available())
{
Serial_write(Serial_read());
}

delay(1000);
}
G15 Shield + PS2 Shield code example:
#include “Arduino.h”
#include “G15.h”
#include “PS2.h”

void setup()
{
G15_begin(19200, 9, 8);
PS2_begin(9600, 2, 3);
pinMode(LED, OUTPUT);

G15_setWheelMode(1);
}

void loop()
{
if(PS2_getVal(p_up) == PRESS)
{
G15_setLED(1, ON, iWRITE_DATA);
G15_setWheelSpeed(1, 1000, CW);
while(PS2_getVal(p_up) == PRESS);
}
else if(PS2_getVal(p_down) == PRESS)
{
G15_setLED(1, ON, iWRITE_DATA);
G15_setWheelSpeed(1, 1000, CCW);
while(PS2_getVal(p_down) == PRESS);
}
else
{
G15_setLED(1, OFF, iWRITE_DATA);
G15_setWheelSpeed(1, 0, CW);
while(PS2_getVal(p_up) == RELEASE &&
PS2_getVal(p_down) == RELEASE);
}
}
Of course this library will update from time to time. We also hope that you can contribute on CIKU libraries too. If you are truly PIC microcontroller lover, we believe you’ll contribute.
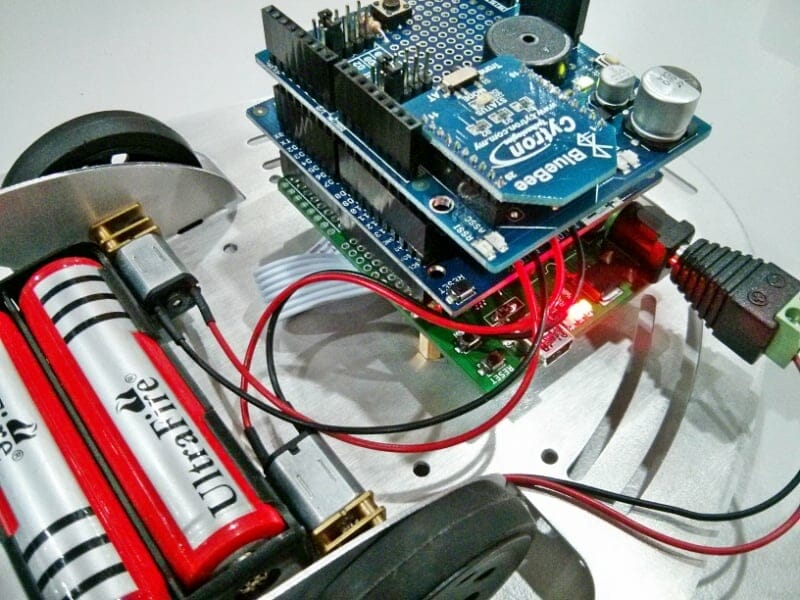
CIKU PROJECT
I want to show you guys the first CIKU project, “Controlling Mobile Robot via Android Bluetooth” (I will explain more detail on another post). I just want to have an experience developing a project with CIKU, and I want to tell you………. IT’S EASY!