 International
 Singapore
 Malaysia
 Thailand
 Vietnam
Your shopping cart is empty!

Uploading Arduino Sketch to BBFuino via BlueBee
- Idris Zainal Abidin
- 07 May 2014
- 470
If you still remember the Arduino Fio (tutorial) where you can upload the Arduino sketch via Xbee (wireless). It is better if you have experience with it and of course you will love it because you can program your Arduino far away from you. Imagine if you are working with some projects that hard to be always near to your PC (in your office/room) like mobile robot, solar (need sunlight), GPS (need to be outside of the building), etc, it is really troublesome if you program them using wired right? Arduino Fio can solve it BUT it needs 2 unit of Xbee, 1 for Arduino and 1 for your PC, and it is costly. So, try this tutorial, you will love it twice. :)
HARDWARE
1. BlueBee (link).
2. Xbee Starter Kit Without Module (SKXBEE-BOARD) (link).
3. USB Mini Cable (link).
4. BBFuino (link).
SOFTWARE
Arduino IDE, telnet sofware e.g HyperTerminal.
HARDWARE SETUP
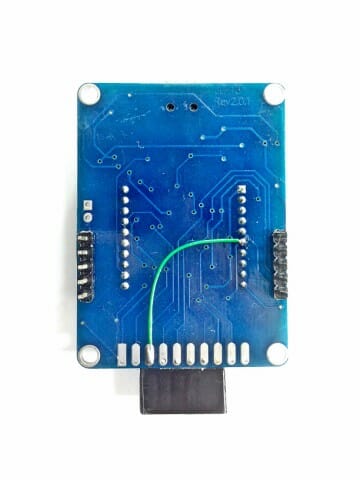
1. Solder female header pin (6 ways) to SKXBEE-BOARD.
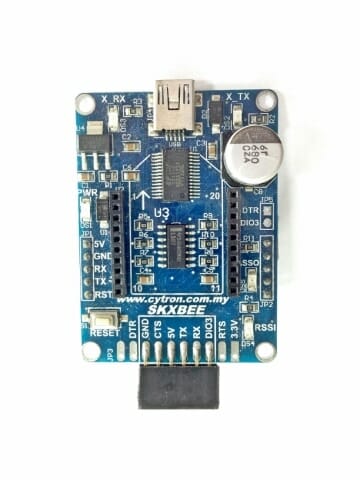
2. Connect pin no-6 on BlueBee to DIO3.
BLUETOOTH CONFIGURATION
1. There have a mini slide switch on the BlueBee, set it to “AT“. (do this 1st!)
2. Attach BlueBee to SKXBEE-BOARD and connect it to PC using USB Mini Cable. (do this 2nd!)

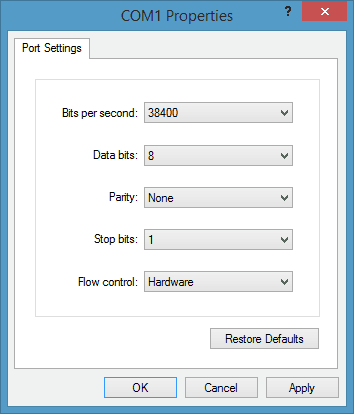
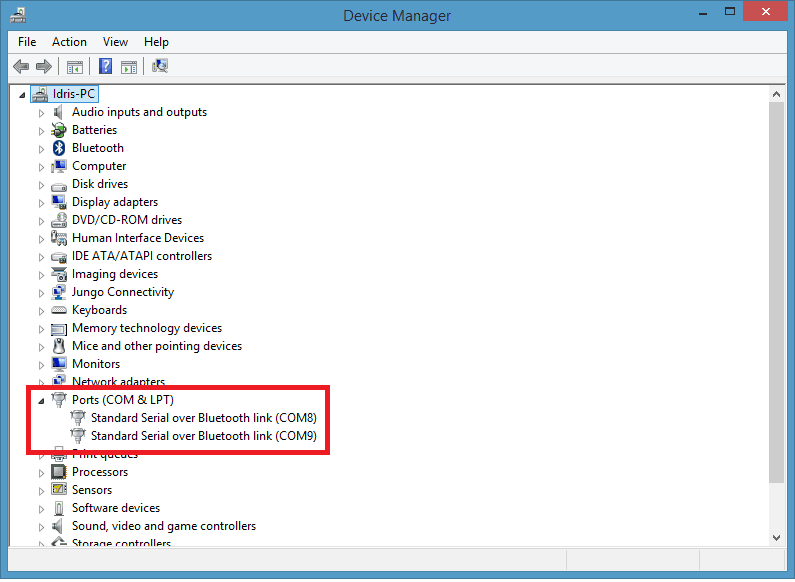
3. Make sure your PC can recognize the SKXBEE-BOARD by giving a COM port number.
4. Open HyperTerminal (telnel software), choose your COM port number and set baudrate to 38400.
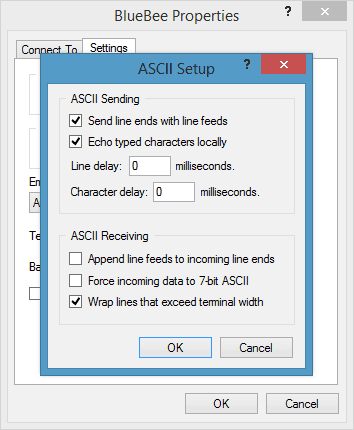
5. Set the ASCII properties as below.
6. Now, time to write the AT command:
AT (followed by enter)
OK (response from BlueBee)
AT+POLAR=1,0 (followed by enter)
OK (response from BlueBee)
AT+UART=115200,0,0 (followed by enter)
OK (response from BlueBee)
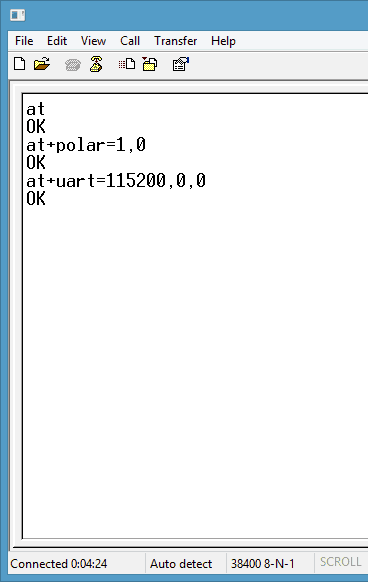
7. Disconnect USB Mini cable and set the mini switch on BlueBee back to “Trans“.
8. Connect SKXBEE-BOARD (BlueBee attach to it) to BBFuino. (as shown in the 1st picture)
9. Power up the BBFuino, then pair your PC bluetooth to BlueBee, insert “1234” as a pairing key.
10. Once done, you will get a bluetooth COM port number (2 COM port).
UPLOAD ARDUINO SKETCH
You can refer to video on the folowing steps:
1. Open Arduino IDE.
2. Open Arduino LED blinking example.
3. Choose Arduino Uno board.
4. Select COM port (there have 2 COM port, choose the smaller number), in my case I will select COM8.
5. Click Upload icon.
6. Done uploading, LED on BBFuino will start blinking. Done!
*If you want to use Arduino monitor to display serial data, make sure to edit the baudrate on Arduino sketch to 115200.
e.g Serial.begin(115200);
**Now you can have a cheaper Arduino wireless programmer. :)